Sun on the counter. Knife on the board. A small pile of fresh ginger sat by the sink. I scraped the thin skin with a spoon. The scent rose fast—bright, clean, and bold. I sliced, blended with cold water, and poured over ice. First sip felt like a spark in the chest and a calm smile after. Friends asked for the recipe that same week. I kept notes, tuned the ratios, and learned neat tricks for a smooth sip and fast clean-up. Here is how to make ginger juice with a blender in a few simple steps. Let’s make a golden glass.
Ingredients and tools (simple, flexible)
Core ingredients
- Ginger root: fresh, firm pieces with a lively scent.
- Cold water.
- Lemon or lime.
- Honey, maple, or sugar.
- Pinch of salt.
Tools you need
- Blender.
- Knife.
- Spoon for peeling thin skin.
- Fine strainer, cheesecloth, or a nut milk bag.
- Jar or bottle for storage.
Produce picks that make a difference
Choose ginger that feels heavy for its size. Look for smooth skin with a light shine. Avoid soft spots, wrinkles, and dry ends. Thin skin peels fast and gives a bright, clean taste.
Step-by-step method: how to make ginger juice with a blender
Step 1: Clean and peel

Rinse the ginger under cold water. Use a spoon to scrape the thin skin. Work around bumps with light strokes. Micro-tip: peel over a bowl for easy clean-up.
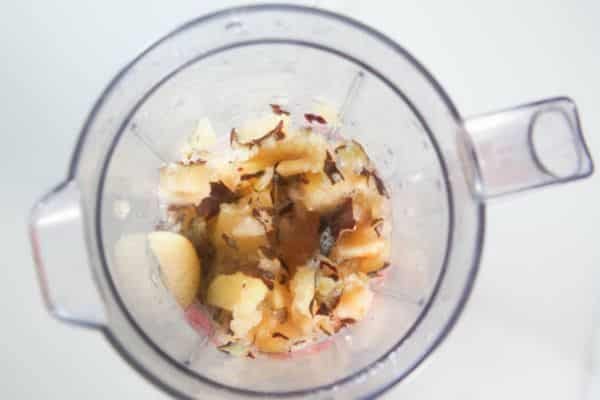
Step 2: Slice thin coins
Cut the ginger into thin coins. Thin pieces blend fast and strain clean. Aim for even slices. Micro-tip: stack a few slices and cut sticks for quicker work.
Step 3: Add ginger and cold water
Place the slices in the blender. Add cold water. For mild: 1/2 cup sliced ginger to 3 cups water. For bold: 1 cup sliced ginger to 2 cups water. Micro-tip: add a tiny pinch of salt now to wake up flavor.
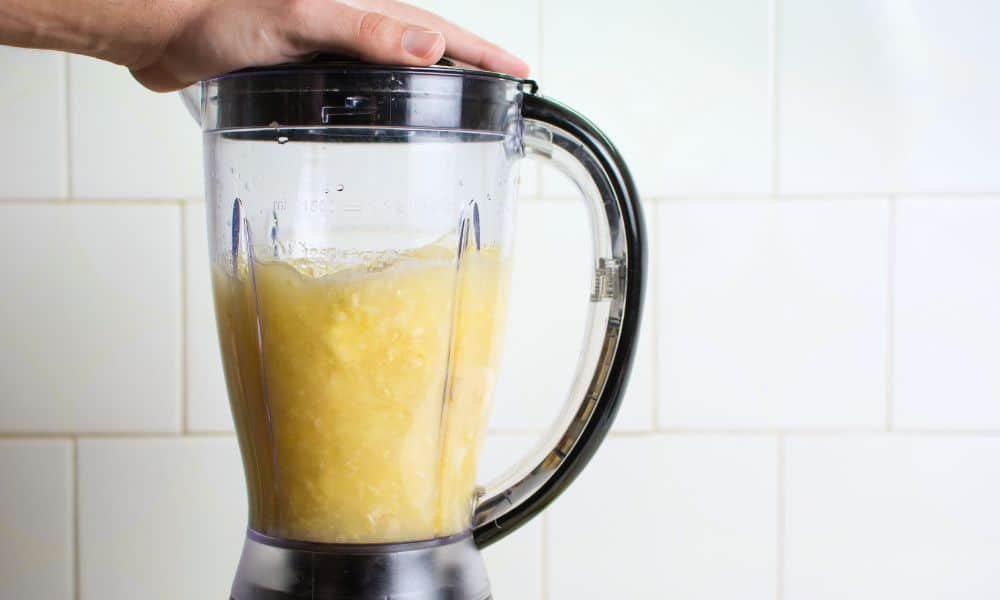
Step 4: Blend to a cloudy mix
Blend 30–60 seconds. The mix turns pale gold and cloudy. Taste a spoon. Add a splash of cold water for a softer sip, then blend 5 seconds more. Micro-tip: rest 5 minutes to pull more aromatic oils from the pulp.
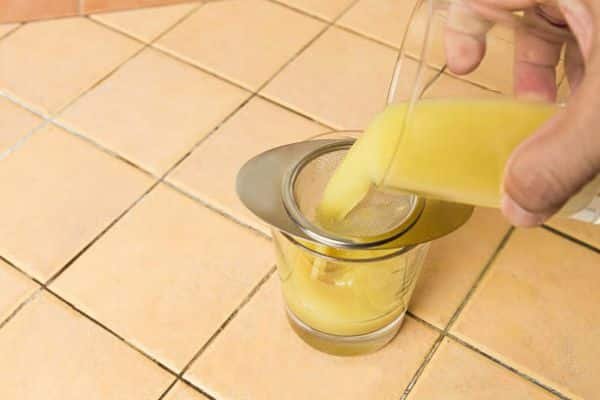
Step 5: Strain or enjoy rustic
For a clear sip, pour through a fine strainer, cheesecloth, or a nut milk bag into a jug. Press or squeeze with gentle hands. Skip straining for a rustic style with light pulp. Micro-tip: strain into a large measuring cup for easy pouring.
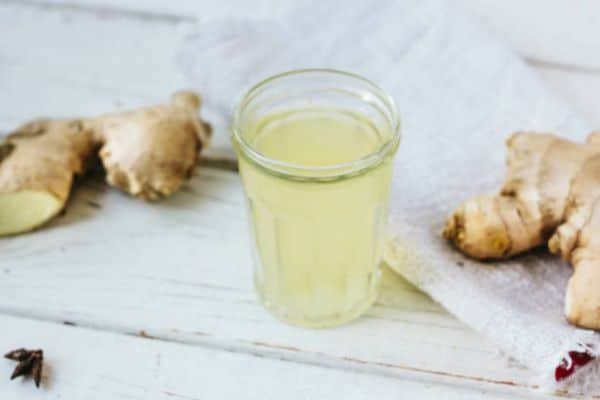
Step 6: Add citrus and a small pinch of salt
Stir in the juice of 1 lemon or lime. Add a tiny pinch of salt to round the heat. Sweeten to taste with 1–2 teaspoons honey, maple, or sugar. Micro-tip: strain citrus through a small sieve to catch seeds.
Step 7: Chill, pour over ice, serve
Transfer to a glass bottle or jar. Chill 30–60 minutes for a smooth, cool sip. Pour over ice and garnish with a lemon wheel or a thin ginger slice. Micro-tip: shake before pouring to blend light sediment.
Flavor profiles and easy ratios
Bold
- 1 cup sliced ginger + 2 cups cold water + juice of 1 lemon.
- Optional: 1 tsp honey or maple for a soft edge.
- Taste: hot, bright, and deep. Great over ice with a lemon wheel.
Daily
- 1/2 cup sliced ginger + 3 cups cold water + juice of 1 lemon.
- Optional: 1–2 tsp honey or maple for balance.
- Taste: warm, clean, and easy to sip. Good for a small daily glass.
Light and zesty
- 1/3 cup sliced ginger + 3.5 cups cold water + juice of 2 limes + pinch of salt.
- Optional: no sweetener or 1 tsp to round the top note.
- Taste: crisp, citrus-forward, gentle heat.
One-line guide to tweak
Move ginger up for more heat, water up for a softer sip, citrus up for extra pop, and sweet down to keep it bright.
Helpful tips from experience

- Pick young ginger for soft heat and a smooth, floral note. Choose older roots for a stronger bite and more warmth. Fresh pieces feel heavy for their size and have tight, smooth skin.
- Let the blended mix rest 5–10 minutes before straining. This short pause helps draw more fragrant oils from the pulp and deepens the flavor without harsh edges.
- Strain with a gentle hand. Light pressure gives clearer juice. A hard squeeze forces fine pulp through the mesh and can make the drink feel grainy.
- Save the pulp. Freeze it in small cubes. Drop into tea for a cozy lift, blend into smoothies for zing, stir into broths and marinades for a warm, fresh kick.
- Use cold water for the blend. Cold keeps the scent bright and the taste clean. Hot water can dull the top notes and push the drink toward bitter.
- Store in glass. Clean glass jars or bottles protect aroma and taste. They also rinse fast and stay odor-free for the next batch.
Storage, food safety, and shelf life
- Chill fast. Pour the juice into a clean, sealed glass jar and place it in the fridge right away. Cold slows flavor loss and keeps the sip bright.
- Mark a date on the lid. A simple label helps track freshness and reduces waste. Clear dates also build good kitchen habits.
- Best within 2–3 days. The taste is sharp and alive on day one. It stays pleasant for a short window, then starts to fade.
- Shake before each pour. Light sediment will settle at the bottom. A quick shake blends it back for a smooth, even sip.
- Signs to toss: dull or sour smell, odd color shift, or an off taste. Trust the senses and discard at the first hint of spoilage.
Budget gear guide: best blender under $50 (for small batches)
What matters for this recipe best blender under $50
- Simple power: a steady 250–600W motor blends thin ginger slices with cold water with ease.
- Sharp blades: clean edges cut fiber fast and reduce strain time.
- Easy-clean jar: a clear jar with simple seals and few grooves speeds wash-up and keeps odors away.
What does not matter
- Many modes: one high speed and a pulse key are enough.
- Large jars: small batches need a compact cup or a 20–32oz jar.
- Fancy screens: lights and presets add cost without better juice.
Practical picks to consider
- Personal-size blenders (250–600W): great for single or double servings. Cups often double as storage with a lid.
- Compact countertop units: one high speed plus pulse, stable base, and a mid-size jar for small families.
What to test or check in reviews
- Noise: steady hum over harsh rattle.
- Seal: no leaks around the lid or base.
- Ease of cleaning: wide jar mouth, removable blade assembly, simple gasket.
- Warranty: even 1 year adds peace of mind at this price.
Final tie-in
A budget unit can handle how to make ginger juice with a blender for home needs. Thin slices, cold water, and short blend times keep stress low on the motor. Sharp blades and a simple jar make the job fast, smooth, and easy to clean.
Troubleshooting for beginners
Too strong
- Add cold water in small steps. Stir and taste after each splash.
- Squeeze in more lemon or lime to balance the heat.
- Chill the jar for 30 minutes to soften the edges.
Too weak
- Blend a bit longer to pull more flavor from the pulp.
- Add a few extra slices and pulse for 5–10 seconds.
- Let the mix rest 5 minutes, then strain.
Bitter taste
- Peel well to remove tough skin and dry ends.
- Use cold water to protect bright notes.
- Keep blend time short and smooth. Long, harsh blends can pull bitter tones.
Grainy feel
- Strain through a finer mesh, cheesecloth, or a nut milk bag.
- Press or squeeze with a light hand to avoid forcing fine pulp through.
- Chill the juice; cold temp makes the mouthfeel smoother.
Not spicy enough
- Choose older ginger next time; it has a stronger bite.
- Raise the ginger-to-water ratio a little at a time.
- Use lime for extra snap and a sharper finish.
Clean-up in two minutes
- Rinse the jar right away with cold water. Swirl to lift fibers from the walls and blade area. Dump and repeat once for a clear start.
- Add a drop of soap and fill the jar halfway with cold water. Close the lid and run a quick 10–15 second blend. This self-wash step loosens pulp in tight spots.
- Rinse well. Pop the lid and blade assembly off, then rinse seals and gaskets. A soft brush around the blade hub clears fine strands.
- Wash the strainer or cloth at once. Use cold water to release starch fast. A light rub removes trapped pulp. Shake off excess water.
- Air dry to avoid odors. Place parts on a rack with good airflow. Set the strainer upright so mesh dries fully. Reassemble only after everything is bone dry.
FAQs
Can this be made without straining?
Yes. Pour straight from the blender for a rustic sip with light pulp. The feel is fuller and the spice hits faster. Start with a small glass to gauge your taste.
Can it be made ahead?
Yes. Store in a clean glass jar in the fridge for 2–3 days. Shake before each pour to blend light sediment. Flavor stays bright in that window.
Is sweetener needed?
No. Taste first. Add a small touch of honey, maple, or sugar only to soften the edge. Stop as soon as balance feels right.
Conclution
A bright glass can change the mood of a day. Ginger juice does that in minutes. The steps are simple. The gear is basic. The taste is clean and bold.
Start with fresh roots. Use cold water. Blend short and strain with care. Add citrus and a tiny pinch of salt. Sweeten just enough to smooth the edge.
Keep a small jar in the fridge for quick sips. Share a batch at brunch. Pour over ice after a long day. Play with ratios and notes. Make it yours.